|
| Reset your Epson printer | Turn
your printer 'Online' | Clean your print heads |
| Cartridge Problems | Other Resetting Methods | Other
Resetting Software |
Resetting your Epson printer
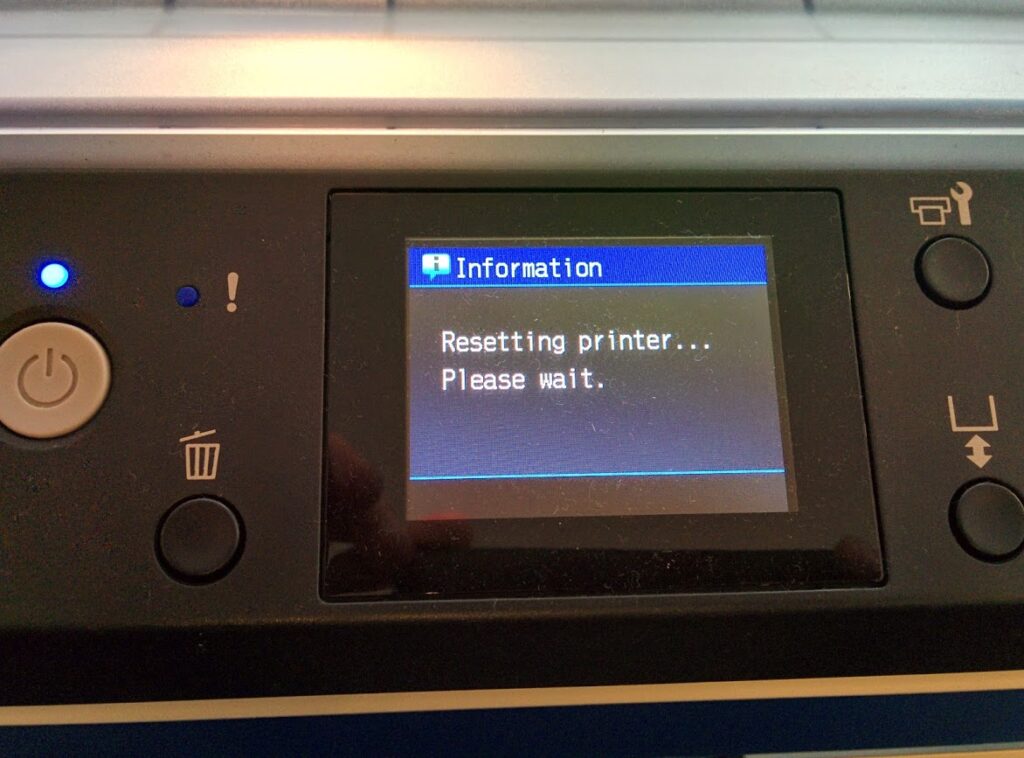
Modern Epson printers have built in software / firmware that counts the prints that you do and each model has a set
limit that will generate messages, saying something like "your printer requires maintenance". These messages
will continue unless you reset the 'Protection Counter', this period is called the 'Overflow'. Each model also has a set
amount of prints allowed on the Overflow, after which your printer will stop working and lock you out completely,
usually with two alternating flashing lights on the printer.
All is not lost!
You can unlock it, reset the overflow and reset the protection counter, bringing your printer back to life.
The reason for having to do this according to Epson, is that your Ink Pad is full and needs replacing.
I had an Epson C86 printer reset under warranty by an Epson dealer and the ink pad was not replaced.
This means that, all you really need to save your printer is the resetting software.
If you have not already downloaded the program click
here to download.
How to use the software
(Note: this software will not work on certain Epson printer models such as the
RX500, to manually reset this, click here)
Installing and opening the software ( SSC Service Utility ):
Install Software ( ssc service utility ) by double clicking on the 'Set Up' file or 'sscserve.exe' you downloaded (first
unpack / unzip it if required).
When Installed, Click on the [Start Button] on your computer desktop, then click on [Program Files] or [Programs] and
select SSC Service Utility from the list, this will open the program. If you chose to have a desktop shortcut when you
installed the program, click this to start the program.
Click on the [Configuration] tab and select your printer from both the [Installed Printers] and [Printer Models] lists.
Please Note: Some models are listed with an 'x' in the model number, this means that the
'x' can be a variety of numbers, for example, if you had an Epson C44 printer the selection for you would be the one
that looks like this 'C4x'. This is because the selection is the same for the C42, C44 & C46 printers.
Also for R265 users, your printer isn't listed so select the R270 with this version (v4.3) until a newer version is
available, I've been told this works.
Now close the program and it will continue to run in your Task Bar on your computer desktop (Blue bar at the
bottom of your computer screen).
The icon looks like this 
You can now click the right mouse button on the icon in the Task Bar to use the menu you require.
Using the software, tips and advice:
If you require more images and simpler instructions for using this software, click
here for the sscserve information page.
Standard Reset
If your printer is giving warnings that your printer is due maintenance, this usually means that the printer has counted
the prints it has carried out and reached a predefined limit, the only requirement now is to reset the counter which
will then release your printer hardware and start counting your prints from zero once more.
Click the right mouse button on the program icon
and select protection counter like so

Click on 'Reset protection counter' and you'll be asked if you have replaced the ink pad, select Yes or OK, it will then
say counter reset.
If you now select 'Show current value', it should show the counter as 0 (zero). If there are any numbers in the counter
overflow, click on 'clear counter overflow'.
You are now ready to continue printing as normal as if your printer is brand new.
Locked Out
If the printer has passed the maximum prints and you've continued printing throughout the warning, after an 'overflow'
amount of prints, it may lock out completely giving you two flashing lights on your printer which you can't reset
without this software or without pressing a sequence of
buttons.
If you are completely locked out:
Firstly, you will normally need to reset the 'Counter Overflow' under the menu listing of [Protection Counter].

Now you will need to use the 'Soft Reset' utility on the menu under [Extra]. Wait about 5 minutes for the printer to
reset.

This will reset your printer and stop the lock out.
If both lights are still flashing or there are any other problems see additional
information below and then return here to continue.
Once your printer is unlocked, the 'Protection Counter' will still need to be reset after this under the menu listing of
[Protection Counter].

You will be asked "Has the Ink Pad been replaced / emptied"? Say [Yes] or [OK] to this, it will then say
"counter reset".
You are now ready to continue printing as normal as if your printer is brand new.
This utility also has other features such as separate colour cleaning and deep cleaning. Beware of the deep cleaning,
this is for very bad clogging on the heads through prolonged lack of use and uses nearly half a cartridge of ink from
all colours to clear the blockages.
These
other utilities are only available to some Epson printer models.
You can also carry out your nozzle checks and other normal utility functions using this software. Use it separately to
your normal Epson printer software and close the program from the taskbar once you have finished with the utility.
The program will normally shut off when you shut your computer down and will not run again unless selected from your
programs list.
*Because the software has unknown
features meant for printer engineers, your antivirus program may see it as a threat, just tell it to ignore it.*
Soft Reset:
This sorts out a multitude of problems.
Some printers are designed to stand alone as well as work with a computer, therefore they have 2 different software
programs controlling them, 1 within and 1 from the computer. This can sometimes throw up a continuous problem or
rejection when an error occurs. Control from the computer is always the best form of printer control as there is so much
more you can do with the diversity of the computer as opposed to the set built in software in the printer.
So when a cartridge circuit fails, your printer will recognise this and tell you of a problem. Unfortunately, printers
don't have the extra facility of 'error message clearing' and may keep showing the same error from that point on unless
the printer 'firmware' is reset in some way.
With the service utility, there are extra functions that can be used for full control of your printer, depending on the
model and level of support supplied for that model. One such useful tool is 'Soft Reset', this will reset anything in
the printer 'buffer' (storage area) and the built in software (firmware). This will normally set your printer back to
its default settings.
To find Soft Reset, click the right mouse button on the SSC Service Utility icon which will be running in the blue task
bar at the bottom of your desktop screen, then select 'Extra'. There you'll find 'Soft Reset'.

When you click the left mouse button on the soft reset, it will take a few minutes to reset so the best advice to give
is to go and make a cup of tea once you've selected it and do absolutely nothing to the computer or printer for at least
5 minutes. Make sure the printer is completely silent (not operating) before closing any programs or switching off the
printer.
Now shut down the computer, switch off the printer, unplug the printer for 2 minutes, plug in the printer, switch the
printer on & start up your computer.
Your printer should now be reset completely with all previous tasks, errors and set-ups forgotten by the printer.
Whatever the problem was before resetting the printer, may still need to be put right. Therefore, if your problem was
cartridge error messages persisting, then you'll need to use the normal 'Maintenance' screen on the computer printer
software and use the 'Ink Cartridge Replacement' button and either pretend to change the cartridge if a replacement
cartridge has already been used to replace a failed one that was giving the error by physically removing it and
reinserting it as if you were changing it or actually change the cartridge if you have not already done so.
If error messages continue to appear after changing more than two cartridges of the same colour, then it is very
possible that the printer circuitry controlling that particular colour has malfunctioned and if still under guarantee (1
year standard), should be put in for service or replacement. Remember that Epson dealers will always try to blame the
use of compatible cartridges for any fault with the printer so it may be advisable to buy an Epson brand cartridge of
the same colour as the failing colour port or if you are a confident person, instruct the dealer or store to repair or
replace your printer with the full backing of the law that allows you to use any brand of cartridge manufactured to suit
your printer.
You may be told that using new cartridges made by OTHER companies (compatible to your printer) nullifies your guarantee.
This is not so! Please mention your rights under the Sale of Goods Act and Consumer Protection Directives of the
European Union, which allow the customer to have an electronic / mechanical item repaired or replaced if faulty / not
serviceable respectively, within 1 year of date of purchase, standard.
There is nothing built into a 'compatible' cartridge that can harm your printer and is rarely the cause of a printer
malfunction / breakdown provided that the correct cartridge has been fitted to the correct location in the printer and
all removable items have been removed from the cartridge. e.g. The pull tab tear off strip and spring clip protectors /
wedges.
How to unlock your Epson RX500 printer
If your RX-500 printer has stopped printing and can't be reset, you will usually see either a
steady red light or alternating red and green lights and the printer will not respond. There may also be a message in
your computer status monitor saying "communication error" / "printer requires maintenance".
This is caused by built in software / firmware which counts the amount of prints you've made and stops when the
protection counter reaches a predetermined limit, also giving the message that your ink pad is full. You will be allowed
a certain amount of overflow prints to the protection
counter limit, after which the printer will completely stop.
There is software online that will normally reset most Epson printers that have reached this limit and is used by
Epson Service Engineers called SSC Service Utility (sscserve.exe), however this does not reset the Epson RX-500
protection counter / firmware.
All is not lost, you can manually reset the firmware using the following sequence of
actions:
Close down all Epson programs
Exit all Epson printer programs that may be running in the background or on your task bar.
The quickest way to do this is to press Ctrl, Alt & Del on your keyboard and release, which will open your Windows
Task Manager.
Click on [Processes] and a list of all processes running on your computer will appear, look for any in the list
that say Epson, highlight it and select [End Process]. Carry this out for any Epson programs running.
Now to reset your printer.
Switch off the printer using the power button.
PRESS and HOLD all following printer buttons: Power, Load/Eject,
Stop, B&W, Color and continue
to hold until "Init eeprom" appears on the printer screen, then RELEASE
ALL BUTTONS.
Next press the Color button to clear the protection counter.
Follow any other instructions given by the printer.
If there are any further problems.
At this point a variety of events could take place, such as the printer software may have switched to offline, the
printer buffer could be holding unprinted tasks and many other hardware and communication blocks, which may still stop
you continuing with normal use of your printer.
If so, simply just;
[Shut Down] your Computer, [Switch Off] your printer with the power button, [Unplug] your printer
by removing the power lead from the back of your printer, [Wait] at least 2 minutes, [Reinsert] the power
lead into the printer, [Switch On] the printer using the power button, [Start Up] your computer.
The printer should now work as normal, but for printers with LCD displays, still follow any instructions your printer
gives you on the LCD display [Printer Screen].
Printer Online / Offline.
If your computer printer software has switched itself offline, open 'My Computer', click on 'Control Panel', click on
'Printers & Faxes', select your printers icon with left mouse button, press right mouse button on the icon to get a
menu, select 'Use printer online'. If this menu choice is not
available, the printer is already online and ready for use. If your printer icon does not have a small black circle with
a white tick, it is not set as the default printer, to do this click the left mouse button once on your printer icon to
highlight it, then click the right mouse button to get the menu and select 'Set as Default'. Close all windows and carry
on printing as normal.
Clean your print heads if print is not perfect.
If your print is not perfect, this may be because your printer has not been used for a while and so the fixed print
heads have dried ink on them.
Simply open any document on your computer, click on [File] then [Print]. When your printer properties box opens click on
[Properties] / [Preferences] then click on [Maintenance] / [Utility].
You will need to carry out 3 head cleans with no printing of nozzle check patterns. To do this, click on [Head Clean],
when finished it will ask you to "Print Nozzle Check Pattern". Don't allow this, click [Finish], then select
[Head Clean] again carrying out the same process until you've cleaned the heads three times, then allow it to print the
nozzle check pattern to check your print quality. If improved but not perfect carry out the above process again. If
perfect, continue to use your printer as normal and try to use it at least once per fortnight.
If absolutely no improvement is seen after cleaning the heads 3 times or more, your heads are severely blocked and will
need cleaning solution to resolve this. Please order the appropriate colour cleaning cartridge for
your Epson printer model, these are reusable and can be kept and stored for future use.
If you have trouble following these cleaning instructions, please use our information
page for step by step procedures with pictures.
Cartridge Rejection Problems:
With limited information on any actions you carried out prior to any error messages, I shall try to help you get
your printer running correctly.

My assumption would be that your printer was out of ink on 1 cartridge and you changed a few cartridges at the same
time.
1) This normally confuses the printer software, as it only expected 1 cartridge and will normally still show
empty for those cartridges that were changed and didn't yet need changing.
2) If any one of the cartridge microchips fail when you change more than 1 cartridge (when not required), the
printer will NOT tell you which chip has failed, it will mark them ALL as failed.
Both problems above should be straight forward to sort out.
The solution, is to use your printer maintenance software that is installed on your computer.
If you are using a printer which has a small screen and a [Menu] / [Set Up] button, you can clear your problems in the
same way as below but, by using the printer maintenance software instead of the computer software.
To get to the maintenance screen on the computer:
Open any document such as a letter or a picture, click on [File] then [Print], when the printer properties box opens,
click on [Properties] / [Preferences], then you'll see a [Maintenance] tab on the next screen, click on this and you're
there.
A lot of Epson printers have different maintenance tools and buttons.
The one you need is called something like [Ink Cartridge Replacement].
If you haven't got a button for this, click on [Head Clean] and it will refuse to clean the heads as you have a
cartridge problem or a cartridge needs replacing. Select [Replace] and you will start a 'wizard' in the same way as it
would start for an [Ink Cartridge Replacement] button, which is a step by step program. Read the screens that appear and
keep clicking next as if you were about to change a cartridge, until you have to click [OK] to move the print head to
the 'Change' position.
___________________________________________________________________________________________________________
For problem 1) above:
If you are sure that all the applicable cartridges giving incorrect levels are full cartridges, open the flap that holds
the cartridges down and (one at the time) unclip and lift each cartridge and press them back into place. This will
trigger the software into accepting the (not yet recognised) cartridge/s as new.
Close the flap when finished and carry on with the on-screen step by steps.
While the printer charges the ink nozzles, it will check your microchips on the cartridges.
For problem 2) above:
Open the flap that holds the cartridges down and unclip and lift the left-most cartridge and press it back into place.
This will trigger the software into checking its chip, click OK to charge the nozzles and if this was the failed
cartridge chip, the other cartridges will suddenly become recognised and that cartridge you just re-inserted (if still
showing as failed) is the failed one that needs replacing.
If you still have all cartridges unrecognised or showing failed. Start the wizard again in the same way and re-insert
the next cartridge in sequence. keep doing the whole procedure for all cartridges in sequence only until the software
shows all other cartridges as recognised except the one you just re-inserted, or all cartridges as recognised (if it was
just previously seated badly). Once a specific failed cartridge has been replaced with a new cartridge, all should be
well.
___________________________________________________________________________________________________________
You may now get some messages telling you they are not Epson cartridges and [Yes] / [No] to continue using the
cartridge, obviously click [Yes].
At this point, if there are any failed chips or empty cartridges that need replacing, you will be told to replace those
applicable before the wizard can complete.
For any unrecognised chips, you can do the same process and just remove and refit that cartridge, incase it didn't make
a perfect contact with the printer, this usually sorts that problem out, but if the software still tells you the
cartridge is not recognised or has to be replaced then please replace it.
This is one occasion where it pays to have spare cartridges ready to use.
On fitting all relevant full cartridges, your printer should now show reasonably accurate ink levels and all cartridges
will be accepted and ready for
use.
If you have used some ink from cartridges that are now showing full then further down the line you might find that
you've completely emptied a cartridge before the software thinks it's empty. This cartridge colour will disappear from
your pattern on the 'Nozzle Check' and must now be replaced, but if you haven't got an [Ink Cartridge Replacement]
button and the software isn't asking for a cartridge to be replaced yet, this can be tricky.
You will now have to clean your heads a few times, to use up some ink until a cartridge is recognised as empty, then you
can activate the wizard by clicking on the [Head Clean] button again, as above.
For future information:
If you are changing cartridges by pressing your ink button on the printer, only change the cartridges that are being
asked for and nothing else.
If you are able to access the Ink Cartridge Replacement wizard on the computer, you can change any
cartridge at any time, but consider how much ink you are throwing away by changing cartridges before they are empty.
If you are using a printer which has its own small screen and a [Menu] / [Set Up] button, you can and should clear your
problems in the same way as above, but by using the printer's maintenance software instead of the computer software.
This information should be sufficient to clear 90% of Epson inkjet printer cartridge problems.
For printer maintenance problems such as "Maintenance Required" or "Ink Pad Full", see
above to download the resetting software and view the Epson printer resetting information.
Alternative Resetting Methods and Software

Occasionally, some users will experience the error on their printer where it stops
printing and all the lights start flashing. Different printer models may have different descriptions of this error, but
it seems to be generally described as a ‘Unknown Printer Error’.
Technically, this condition requires an Epson service engineer to resolve. It is however, possible that you could fix it
yourself by resetting the printer and clearing the counter of how much ink has gone to those pads. You can do this as
follows: (this seems to work on numerous Epson desktop printers, but we make no claims about it’s reliability on your
printer. Use at own risk etc!) However, we now have three separate procedures!
Additionally, we are now starting to hear about similar-sounding issues with the 2100 printer - except the printer is
helpfully warning of the error before it just stops printing! The message you will see says something like ‘Parts
inside the printer are nearing the end of their service life’. Presumably at some time it will just refuse to print,
unless the problem is addressed more directly. If you experience this error with a 2100 printer, you may like to see if
the button methods outlined below can work. Alternatively, see Procedure 4.
Procedure 1
We found this procedure to work for the Stylus Photo 1270 type printer, and understand that it also works for the
Photo 870 range and even earlier models like the Stylus Color 740. The error is indicated on these printers by all four
lights on the printer flashing. Even if you press the power switch on the printer, the lights continue to flash, and the
printer does not turn off!
Turn off your printer, ensuring that the print head is at it’s home location and locked in place as normal;
Power off the printer at the wall or by removing the power cable, for at least 20 seconds;
When you restore power to the printer at the wall socket or by reinserting the cable, if the lights come back on
straight away, the printer’s power switch was ‘on’ - switch it off and return to step 1;
Hold down the paper-feed button and the button with the ink-drops next to it, and then turn on the printer, still
holding the buttons down;
When the paper-out LED flashes, release the buttons;
Press and hold the Cleaning button, until several lights flash - this will take a few seconds (i.e. then release the
button);
The printer will now attempt to reset, including resetting the EEPROM memory and running a short (about 10 seconds)
cleaning cycle.
Procedure 2
Turn off your printer, ensuring that the print head is at it’s home location and locked in place as normal;
Hold down the paper feed button only;
Turn on the printer;
As the paper feed light starts flashing, release the button;
Immediately hold down the ink-drops button for some 10-20 seconds or until the printer springs into life;
Allow printer to complete it’s processing, then turn off for a few seconds, and back on again for a newly working
printer!
Procedure 3
For Epson Photo 1290 and possibly Epson Photo 890 printers
1290 printer with green (power / data) and red (ink / paper feed) lights flashing alternately:
Switch off printer with panel switch;
Switch off printer at mains switch - leave off for 20+ seconds;
Hold down roll feed and sheet feed buttons;
Switch on at mains;
Switch on at printer panel;
Continue to hold down roll and sheet feed buttons until both green and red lights flash together in synchronisation, not
alternately;
Switch printer off and then, after a few seconds, on again at mains switch;
When red and green lights are both flashing in synchronisation, release the roll and sheet feed buttons;
Press and hold down the ROLL FEED button (the one at the extreme left) and keep it down until the machine finishes
whirring, cleaning etc and the green light comes on steady;
Release the roll feed button and all should be well.

Procedure 4
Software Reset Methods!
If your printer is not supported by our free SSC Service Utility (Resetting Software) above, you can download one
specifically for your Epson printer model from the company below. Cost $20.49, about £13.66 (in March 2010).
Adjustment Service programs can be downloaded at www.2manuals.com
There is a software reset method that can be used to reset ink levels, which is used in Epson service centers. Each
printer model has a specific service (adjustment) program, which has options such as Reset Protection Counter when you
need to reset the value of Waste Ink Counter. You can learn more about software reset method at this link: About
Service Programs.
This programs can be used to reset a number of counters in the printer. Please note that CIS users should probably steer
clear of any resetting of cartridge ink levels in the printer, and you will probably need to look for the ‘Protection
Counter’. Due to the risks of resetting this protection counter, it may be preferable to use the software once to
reset the counter, then uninstall it so you do not inadvertently reset the counter more than once.
According to it’s own readouts, it did reset the ‘protection’ counter... but pretty much did so of it’s own
accord. It then seemed to interfere with printing! However, the access to advanced cleaning function control etc looks
useful. Nevertheless - use with caution as per the notes above!
Reset Error Light Conditions Summary
OK - so whilst we have heard this resolves the problem, it may not do so for you, and whilst we have heard that the
ink-pad error is most likely way before the ink pads are actually full, we think it will be OK. However, you should be
aware that IF your ink pads were full then resetting the counter on the printer without replacing the pads could
ultimately cause damage to your printer and surrounding areas as inks starts to pool inside the printer base and
potentially leak out. We suspect that this will not happen for the vast majority of people, but it is certainly
possible. We have now heard of this occurring for a couple of people.
Instructing you how to dismantle the printer to examine the waste ink pads is currently outside the scope of our support
assistance (though we have done this task ourselves with minimum fuss). You may like to refer to our Service Manuals
page and Spares Printers Parts UNICOMP site.
=================================================================================================
Using the Adjustment Program to reset waste ink counter
Since your printer consumes ink not only for printing but also for other operations like cleaning, a certain amount
of ink is wasted and it is collected by the waste ink pad. Therefore, you'd think the printer counts the amount of waste
ink, but it actually just counts the amount of page prints.
Once the amount reaches the predefined limit, the printer indicates "MAINTENANCE REQUEST", you must reset the
maintenance error condition and the waste ink counter value stored in EEPROM on the main board of the printer.
The adjustment program enables you to perform maintenance and adjustment functions such as:
EEPROM initial setting
Ink Pad Counter reset
Initial Ink Charge
Head ID Setting
Top margin Adjustment
Bi-D Adjustment
USB ID Input
Note: This example shows you how to reset waste ink counter of Epson R280, R285, R290 printers. Other printer models may
have different set of functions, and you must double check the service manual for a specific printer that you are going
to troubleshoot.
Warning: misuse of a program may damage printer's EEPROM! Run the program under Window XP only.
How to reset waste ink counter by adjustment service program for Epson R280, R285 and R290 printers.
1. Download the Epson R280 adjustment program from www.2manuals.com.
2. Save archive and unpack using WinZip
3. Change PC date to 10 April 2008 or another earlier date. Just double click in the right bottom of your screen and
change date.
4. Run AdjProg.exe program using Windows XP. Press [ ACCEPT ].
5. In new window, check Particular Adjustment mode.
6. Then check Waste Ink Pad Counter option.
7. Click [ CHECK ] to check the current counter value (if required).
8. To reset waste ink counter, check both boxes and press [ INITIALIZATION ].
9. Then press [ OK ].
10. Resetting process will take a few seconds:
11. To finish, power off the printer. The data will be saved in the printers EEPROM.
A Message will appear: "The waste ink pad counter has been initialised properly"
Switch the power ON and check the counters value.
Other
printers adjustment programs work the same way.
New Epson adjustment programs are connected to one PC and can work with one PC only
Adjustment Service programs can be downloaded at www.2manuals.com
and cost $20.49 which is about £13.33 (March 2010) |
| Any reference to OEM (Original Equipment Manufacturer) for
compatible items is purely for compatibility reference. The trademarked names are also for reference to the printer make
& model. We do supply Trademarked OEM and these are listed under their own category, Originals (OEM). All
competitors / manufacturers prices (Retail Prices / RRP) are referenced to the published prices on the World Wide Web in
July 2002. |
For Further Information
Telephone: 01792 548731
Email |

The INK Store
101 Clase Road, Morriston, Swansea, UK. SA6 8DY
Tel: 01792 548731
Page last updated: 07 February 2011
Rules & conditions apply, Click to view Terms, Conditions & Customers
Rights.
No VAT to be added
Credit / Debit cards accepted

 |